28 Easy DIY Halloween Decorations: Cheap & Simple


*This post may contain affiliate links. As an Amazon Associate we earn from qualifying purchases.

28 Easy DIY Halloween Decorations: Cheap & Simple

Making DIY Halloween decorations is an absolute game-changer when you are on a budget. You don’t have to miss out on the Halloween fun just because you don’t want to spend a fortune!

I don’t know about you when I was a kid and even as an adult, one of my top two favorite holidays has long been Halloween.  Maybe it’s the fun or getting to be someone else for a day, or night or well, there’s the candy too!

Since we’ve moved I see few trick-or-treaters but still have vivid memories of the days I trick-or-treated in my old neighborhood. Oh, the anticipation and yes, the mischief!  These ideas are fun, on point for an awesome frugal DIY Halloween.  

I just know you’ll find one or all of them perfect for your trick-or-treaters or just for yourself like me!  This year I’m really digging the skeletons, check out my Pinterest board ‘Halloween’, you’ll see what I mean haha!
Don’t have time to do it all yourself. Check out these super cheap already done Halloween decorations by clicking here.

easy diy halloween decorations

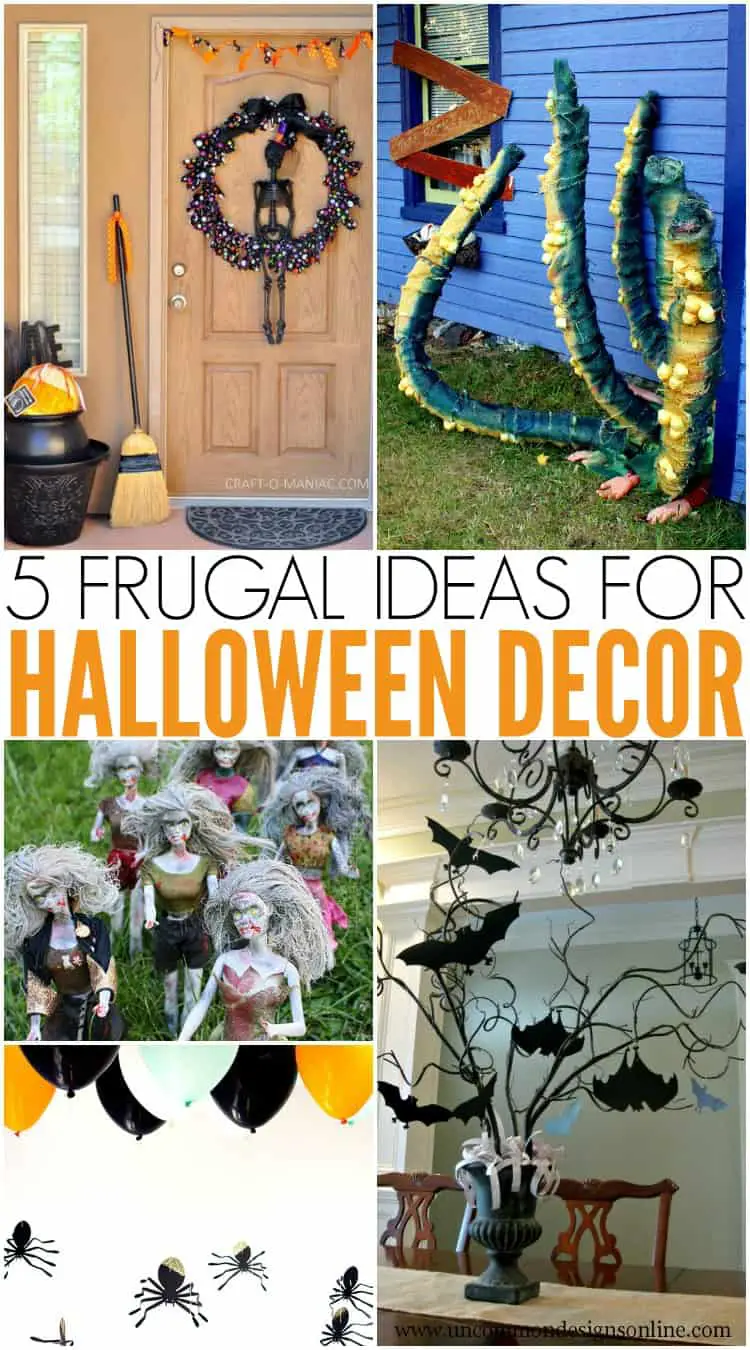
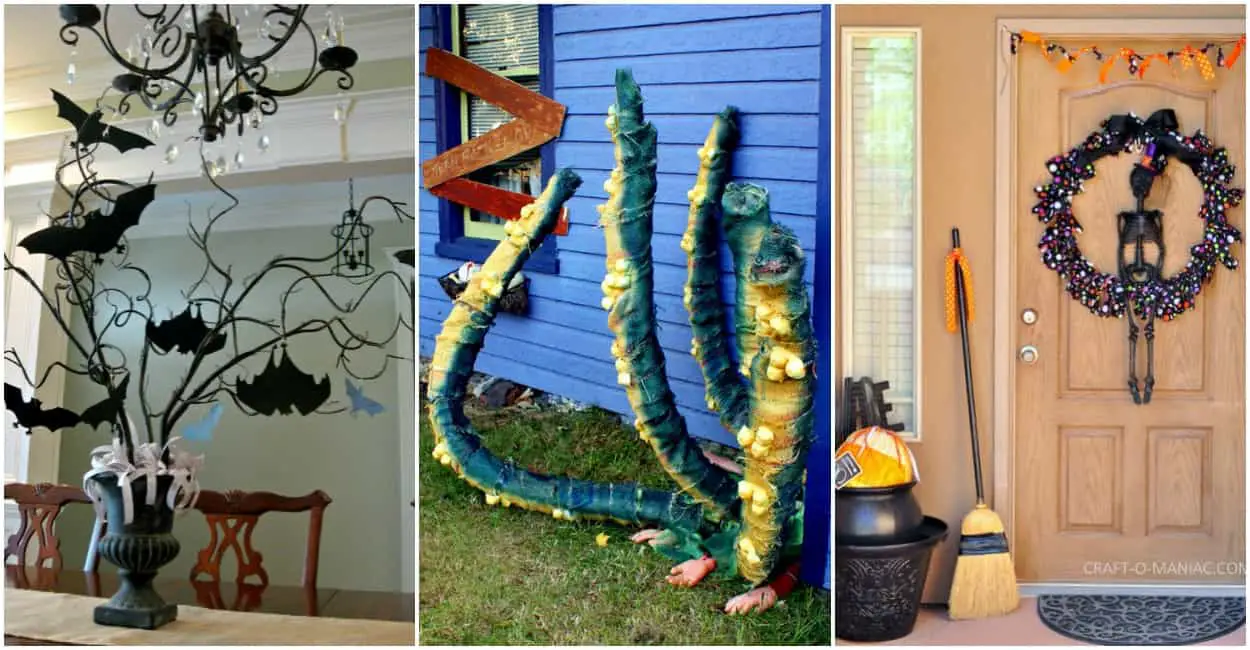
1. Skeleton Wreath Decoration for Halloween

Alright, let’s talk about the easiest, spookiest, and totally budget-friendly Skeleton Wreath you’ll ever make! Got some leftover ribbons from birthdays, Christmas, or that one craft project you swore you’d finish?

Perfect! Grab those ribbons, twist ’em, curl ’em, and tie ’em around a wreath frame or even an old hanger bent into a circle. Now, add some mini skeletons you can snag from the dollar store, and voila! You have a Halloween masterpiece that screams, “Welcome to the haunted house!”

It’s so easy, even your kiddos can help out – just make sure they don’t get tangled in the ribbon!

If you have one larger leftover skeleton from some other Halloween decor you can certainly just paint him black (or whatever color you choose) and hang him right in front of the wreath that you made (as seen in the pic above).

2. Paper Bat Tree Decor for Halloween

Imagine a centerpiece that’s equal parts spooky and adorable – that’s the Paper Bat Tree for you! Start by collecting some branches from your yard (or a nearby park if you’re city-bound like me). Paint them black for that extra eerie vibe.

Next, cut out bat shapes from black construction paper. You can even get the kids involved in this – a little family craft time is always a win! Attach the bats to the branches with clear thread or fishing line, and there you have it, a batty tree that’ll make your dining room table the talk of the Halloween party.

Bonus points if you add some mini LED lights to give it a spooky glow!

3. Giant Tentacles Halloween Decor

diy halloween tentacle

Ever wanted to turn your home into a scene straight out of a spooky underwater adventure? Now you can with these giant tentacles!

Start with pool noodles – they’re flexible, lightweight, and perfect for this project. Shape the noodles into wavy tentacles and cover them with burlap for a rough, sea-creature texture.

Use egg cartons cut into small sections for the suckers and glue them on. Paint everything in shades of green, purple, or whatever monstrous hue you fancy.

Position these tentacles around your porch or front yard to give trick-or-treaters a thrilling surprise. Trust me, they’ll remember your house forever!

4. Hanging Spider DIY Halloween Decorations

Who knew that helium balloons could be so delightfully creepy? For these Hanging Spiders, all you need are black helium balloons, some black construction paper or felt, and a bit of creativity.

Cut out eight spider legs for each balloon and attach them with tape. Draw on some menacing eyes with a white marker or add googly eyes for a fun twist. Let these spiders float around your living room or hang them from the ceiling with string. They add the perfect touch of spooky fun without breaking the bank.

If you want to go with the even easier approach just cut some spider shapes out of construction paper, tie them to some strings and then attach to the helium balloons. You won’t get as authentic of an experience but it will still be great decor.

Plus, watching these spiders bob around will definitely get everyone in the Halloween spirit!

5. Zombie Barbie Halloween Decorations

Zombie Barbies might just be my favorite Halloween DIY yet! Head over to your local Goodwill or hit up a yard sale to find some old Barbies. The messier, the better!

Give these dolls a zombie makeover with some gray and green paint, torn clothes, and a little fake blood. You can even mess up their hair (more than it already is) to add to the undead vibe. Display these creepy creations in your yard, on your mantel, or anywhere that needs a touch of zombie chic.

They’re guaranteed to be a conversation starter and a hit with the neighborhood kids and adults alike.

6. Homemade Hanging Halloween Cages

Okay, let’s get a little spooky with these homemade hanging Halloween cages! You won’t believe how easy it is to create these eerie cages that look straight out of a haunted house.

All you need is some chicken wire, black spray paint, and a few creepy props. Shape the chicken wire into a cage-like structure – it doesn’t have to be perfect; the more jagged, the better!

Spray paint it black for that ominous look. Once it’s dry, fill the cage with skeletons, fake crows, or even some creepy cloth with eye holes cut out to amp up the fear factor.

Hang these cages around your porch or in your yard, and watch as your trick-or-treaters approach with wide eyes and shivers!

7. Lawn Ghost Halloween Decorations

Who says ghosts have to be scary? Lawn ghosts are the perfect blend of spooky and adorable, and they’re super easy to make. Gather some white sheets, balloons, and sticks. Inflate the balloons and tie them to the top of the sticks, then drape the white sheets over them to create your ghostly figures.

Use black fabric paint or markers to draw spooky or silly faces on the sheets. Stick these friendly phantoms in your lawn, and you’ve got a ghostly gathering that will delight kids and adults alike.

Bonus points if you add some glow-in-the-dark paint for an extra eerie effect when the sun goes down!

8. Man-Eating Plant Halloween Decor

Ever wanted to have your very own Little Shop of Horrors moment? Now’s your chance with these DIY man-eating plants!

Start with a large plastic flowerpot and some flexible foam tubes. Shape the tubes into creepy, curved stems and secure them to the pot. Cover the stems with green fabric or paint for a realistic look.

Next, create the “mouth” of the plant using papier-mâché or a large, hollowed-out foam ball painted with sharp teeth and a bright red interior. Attach some large leaves made from construction paper or fabric, and position your terrifying plant near your entrance.

Your trick-or-treaters will think twice before reaching for candy!

9. Front Door Decorated like a Jack-O-Lantern for Halloween

Transform your front door into a giant Jack-O-Lantern and make your house the most inviting (and spooky) spot on the block! This decoration is both festive and easy to pull off.

Start by covering your door with orange craft paper or fabric. Then, cut out eyes, a nose, and a mouth from black construction paper – go wild with the expressions! Use tape or adhesive to stick the facial features onto the door.

For an added touch, outline the features with some LED string lights to make your Jack-O-Lantern glow at night. It’s a fun, budget-friendly way to celebrate Halloween and welcome guests with a big, spooky smile!

10. Halloween Spooks Made from old Amazon Boxes

Got a stash of Amazon boxes piling up? Put them to good use with these DIY Halloween spooks!

Cut the boxes into spooky shapes – think ghosts, witches, and goblins. You can use a template or freehand it if you’re feeling crafty. Paint them in eerie colors, add some details like eyes and mouths, and voilà! You’ve got a set of Halloween decorations that are both eco-friendly and budget-friendly.

Arrange these spooks around your house, in the windows, or even hang them from trees in your yard. It’s a great way to upcycle and get into the Halloween spirit!

11. Hanging Ghosts and Ghouls Made from Old Paper Bags

Paper bags aren’t just for groceries – they make fantastic Halloween decorations too! To create hanging ghosts and ghouls, start by stuffing a paper bag with crumpled newspaper to give it some shape.

Tie off the top with string to form the head, and then cut strips into the bag for a flowing ghostly body. Paint the bag white for ghosts or gray and black for ghouls. Add some spooky faces with markers or paint, and hang these spectral figures from your porch or trees.

They’re lightweight, easy to make, and add a wonderfully creepy touch to your Halloween decor.

12. Halloween Tree and Jack-O-Lanterns Made from Cardboard Boxes

Let’s get creative with cardboard boxes and make a Halloween tree adorned with Jack-O-Lanterns!

Start by stacking and securing several boxes to form the trunk and branches of the tree. Paint the whole structure black or dark brown. For the Jack-O-Lanterns, cut out small box pieces into pumpkin shapes, paint them orange, and add faces with black paint.

Attach these mini Jack-O-Lanterns to the branches with glue or string. You can also add some fairy lights to give your tree a magical glow. Place this spooky tree in your yard or inside your home to impress all your Halloween visitors!

13. Halloween Tree Decorations Made from Cardboard

Cardboard is a versatile material that can be transformed into all sorts of Halloween decorations, including a spooky Halloween tree! Cut out a piece of cardboard wrap it around the tree and tape it closed. Then using paint, tape, or markers draw on the face.

If you want it to look a lot better you can easily go through and make these a lot better by using larger pieces of cardboard, painting all of the cardboard that is showing, or using LED solar lights for the eyes or outline of the face.

14. Halloween Spook Decorations Made Entirely of Cardboard Boxes

Got a stack of cardboard boxes? Perfect! Let’s turn them into a spooky Halloween display that’s both budget-friendly and eerily awesome.

Start by cutting the boxes into various shapes like ghosts, tombstones, and eerie trees. Paint them in dark, spooky colors – black, gray, and white work best. Add some creepy details with markers or additional cardboard cut-outs, like ghostly faces or skeletal hands.

Arrange your spook-tacular creations around your yard or inside your home for a DIY haunted house feel. These decorations are not only cheap and easy to make but also a fun way to get the whole family involved in the Halloween spirit!

15. Painted Cardboard Cylinders for Halloween

Don’t toss those cardboard cylinders from paper towels and toilet paper – turn them into Halloween decorations! Paint the cylinders in various spooky colors like black, orange, and purple.

Once they’re dry, decorate them with faces, patterns, and other Halloween motifs. You can turn them into mini ghosts, pumpkins, or even creepy eyeballs.

Arrange these painted cylinders around your home, on the mantel, or as part of your Halloween tablescape. They’re simple to make, cost almost nothing, and add a fun, homemade touch to your Halloween decor.

16. Construction Paper Cut-Out Bats Halloween Wall Decor

Bats are a classic Halloween symbol, and with just a bit of construction paper, you can cover your walls in these nocturnal creatures. Use a template to cut out bat shapes from black construction paper.

Make a bunch – the more, the better! Attach them to your walls with removable adhesive or tape, creating the illusion of bats flying across your home. You can also add some glow-in-the-dark paint for an extra spooky effect at night.

This easy and inexpensive decoration is perfect for adding a creepy, crawly vibe to your Halloween setup.

17. Orange Tablecloth with Paper Bats Glued on Top

Transform your dining table or walls into a Halloween masterpiece with a simple orange tablecloth and some paper bats. Start by laying out the orange tablecloth.

Then, cut out a bunch of bat shapes from black construction paper. Arrange the bats on top of the tablecloth in a fun, swirling pattern as if they’re flying across the table. Glue or tape them in place to keep them from moving.

This decoration is perfect for a Halloween party or family dinner, adding a festive touch to your table without breaking the bank.

18. Halloween Table Decor: Made from Cardboard

Your Halloween table decor can be both spooky and sustainable with cardboard! Create centerpieces and place settings from recycled cardboard boxes.

Cut out shapes like pumpkins, witches, and ghosts, and paint them in bright, festive colors. You can also make name tags for your guests by cutting out small shapes and writing their names on them.

Arrange these cardboard creations around your table, add some candles or fairy lights, and you’ve got a charming, eco-friendly Halloween tablescape that will wow your guests.

19. Construction Paper Witch Silhouette Cut-Out

Channel your inner witch with these construction paper witch silhouettes! Use black construction paper to cut out witch shapes – think pointy hats, broomsticks, and flowing robes.

Tape these silhouettes to your windows or walls for a classic Halloween look. You can even add some green or purple paper for a pop of color.

These silhouettes are easy to make, super affordable, and add a timeless spooky charm to your home. Plus, it’s a fun project to do with the kids as you get ready for the Halloween festivities.

20. Old Wood Pumpkins

Give your Halloween decor a rustic twist with old wood pumpkins! Find a chunky piece of wood, stand it upright, and use a chisel to carve out chunks until you get something that resembles a pumpkin face.

Paint the carved areas orange and add details for the eyes and mouth. You can even add a small piece of wood on top as a stem.

These wooden pumpkins are durable, eco-friendly, and have a charmingly rustic look that will make your Halloween setup stand out. Place them on your porch or in your garden for a festive touch.

21. Large Cardboard Cut-Out of a Witch Silhouette

Take your Halloween decorations to the next level with a large cardboard cut-out of a witch silhouette. Find a big piece of cardboard, draw a witch shape with a pointy hat and broomstick, and cut it out.

Paint the silhouette black and add some glow-in-the-dark paint for an extra spooky effect at night. You can prop this up in your yard, against a tree, or even attach it to your house.

This towering witch will surely make your home the talk of the neighborhood and give your Halloween decor a dramatic flair.

22. Outdoor Halloween Decor made from Sticks and Limbs

Nature provides the best materials for a creepy Halloween display! Gather sticks and tree limbs from your yard or a nearby park. Use them to create eerie decorations like haunted trees, spooky fences, or even skeletal hands reaching out of the ground.

You can bind the sticks together with twine or hot glue and paint them black for an extra spooky effect. Arrange these natural decorations around your yard to create a haunted forest vibe that will send chills down the spines of anyone who dares to approach your house on Halloween night.

23. DIY Halloween Ghost Decorations: Made of White Plastic Garbage Bags

Let’s get ghostly with these super simple and delightfully spooky DIY Halloween ghost decorations made from white plastic garbage bags! This is a fantastic project that’s perfect for the whole family and won’t break the bank.

Materials Needed:

  • White plastic garbage bags
  • Old newspapers or plastic bags (for stuffing)
  • String or fishing line
  • Black markers
  • Scissors

Steps:

  1. Creating the Ghost Body: Start by stuffing one white plastic garbage bag with crumpled newspapers or other plastic bags. This will form the head of your ghost. Once you’ve got a nice, round shape, tie off the top with a piece of string or twist tie to secure it.
  2. Shaping the Ghost: Drape another white plastic garbage bag over the stuffed head to create the ghost’s flowing body. You can trim the bottom of the outer bag into strips or jagged edges to give it a more eerie, ghost-like appearance.
  3. Adding the Face: Use a black marker to draw spooky or silly faces on the ghost. Go wild with creativity – some ghosts can look friendly while others might have a more menacing expression. You can also cut out eyes and mouths from black construction paper and tape them on if you prefer.
  4. Hanging Your Ghosts: Attach a piece of string or fishing line to the top of the ghost’s head for hanging. You can hang these ghosts from tree branches, your porch, or even inside the house. For an extra spooky effect, try using glow-in-the-dark paint on the faces or adding some LED lights inside the ghosts to make them glow at night.

These DIY ghosts are not only easy to make, but they also add a fantastic, eerie touch to your Halloween decorations. Plus, they’re durable enough to withstand the elements if you’re planning to hang them outside. Kids will love helping out with this project, and you’ll have a hauntingly beautiful display to show off to your neighbors.

24. Halloween Jack-O-Lantern with Witches Hat (Made of Construction Paper)

Who says Jack-O-Lanterns have to be carved out of pumpkins? Let’s get crafty and create a Halloween Jack-O-Lantern with a witches hat, all made from construction paper! This easy and fun DIY project is perfect for adding a whimsical touch to your Halloween decor.

Materials Needed:

  • Orange construction paper
  • Black construction paper
  • Green construction paper (optional)
  • Glue or tape
  • Scissors
  • Markers

Steps:

  1. Creating the Jack-O-Lantern Body: Start by cutting a large circle out of the orange construction paper. This will be the body of your Jack-O-Lantern. If you want to add some dimension, you can make several circles and layer them together, gluing the edges to give it a slightly 3D effect.
  2. Making the Face: Cut out eyes, a nose, and a mouth from the black construction paper. You can make the classic triangular eyes and a jagged mouth, or get creative with different shapes and expressions. Glue or tape these pieces onto the orange circle to create the Jack-O-Lantern’s face.
  3. Adding the Witches Hat: For the hat, cut a large triangle from the black construction paper for the main part of the hat. Then, cut a small strip for the hat’s brim. Attach the brim to the bottom of the triangle to complete the hat. You can also add a green construction paper band or a buckle for extra detail. Glue or tape the hat to the top of the Jack-O-Lantern’s head.
  4. Finishing Touches: If you want to add some extra flair, cut out a few leaves or a vine from the green construction paper and attach them to the top or sides of the Jack-O-Lantern. You can also use markers to add additional details like shading or patterns on the pumpkin and hat.
  5. Displaying Your Craft: Hang your Halloween Jack-O-Lantern with a witches hat on your door, wall, or window. You can also make a few different sizes and arrange them together for a festive display. These paper Jack-O-Lanterns are lightweight, easy to make, and perfect for indoor decorations.

This DIY project is not only budget-friendly but also a fantastic way to get into the Halloween spirit with a little bit of creativity and fun. Kids will love helping out, and you’ll have a charming, witchy Jack-O-Lantern to show off this spooky season!

25. DIY Toilet Paper Roll Bat Candle Holders

Alright, mamas, let’s turn those leftover toilet paper rolls into the cutest and spookiest bat candle holders for Halloween! These DIY bat candle holders are perfect for adding a touch of eerie ambiance to your home without any fire hazards, thanks to LED candles. Let’s dive into this fun and easy craft!

Materials Needed:

  • Empty toilet paper rolls
  • Black construction paper
  • LED tea light candles
  • Glue or tape
  • Scissors
  • Black paint (optional)
  • White marker or googly eyes

Steps:

  1. Preparing the Bat Body: If you want your bats to have a sleek, uniform look, start by painting the toilet paper rolls black. This step is optional but gives a nice, polished finish. Let them dry completely before moving on to the next step.
  2. Creating the Bat Wings: While the rolls are drying, cut out bat wings from the black construction paper. You can freehand the wing shape or use a template if you prefer. Make sure the wings are proportional to the toilet paper roll size. Once you have the wings, fold a small tab on the inner edge of each wing – this will make it easier to attach them to the roll.
  3. Attaching the Wings: Glue or tape the folded tab of each wing to the sides of the toilet paper roll. Position them so the wings extend outwards, giving your bat a ready-to-fly look.
  4. Adding the Face: For the face, you can either draw eyes and a mouth directly onto the roll with a white marker or glue on some googly eyes for a fun touch. Draw on some fangs or a mischievous smile to give your bat a personality.
  5. Inserting the LED Candle: Place an LED tea light candle inside the top of the toilet paper roll. The candle should fit snugly and sit slightly above the rim of the roll to mimic the look of a glowing bat head. If the candle is too loose, you can use a bit of tape around the base of the candle to secure it in place.
  6. Displaying Your Bat Candle Holders: These bat candle holders can be placed on tables, shelves, or even your windowsill. The LED candles give off a safe, flickering light that adds to the spooky atmosphere without any risk of fire.

These DIY bat candle holders are not only adorable and spooky but also a fantastic way to recycle those toilet paper rolls. This project is quick, easy, and perfect for getting the kids involved in Halloween decorating.

Plus, the glowing LED candles will give your home that perfect eerie touch for all your Halloween festivities.

26. Cardboard Cut-out Tombstone Shape Ghosts

27. Cardboard Cut-out Tombstone Shape Ghosts

Let’s get creative with some spooky, yet adorable tombstone-shaped ghosts made from cardboard! These DIY decorations are perfect for adding a haunted cemetery vibe to your Halloween setup, and they’re super easy to make with just a few supplies.

Materials Needed:

  • Large cardboard sheets
  • White and black paint
  • Paintbrushes
  • Scissors or a box cutter
  • Black markers
  • Glue or tape

Steps:

  1. Creating the Tombstone Shape: Start by drawing tombstone shapes on your cardboard sheets. You can make them simple rectangles with rounded tops or get creative with different tombstone designs. Once you’re happy with the shapes, cut them out using scissors or a box cutter. Be sure to do this on a safe surface and with adult supervision if kids are involved.
  2. Painting the Tombstones: Paint the entire tombstone shapes with white paint to create a ghostly effect. You might need a couple of coats to get a solid color. Let them dry completely between coats. (you can also cover with cheap plastic tablecloths if you prefer).
  3. Adding Ghost Faces: Once the white paint is dry, use black paint or markers to draw spooky ghost faces on the tombstones. You can make them as friendly or as scary as you like! Experiment with different expressions to give each ghost its own personality.
  4. Detailing the Tombstones: For an extra touch of authenticity, use black paint or markers to add cracks, names, and dates to the tombstones. You can write funny epitaphs or just stick with classic “RIP” inscriptions. This adds a little humor and a lot of character to your tombstone ghosts.
  5. Setting Up Your Tombstone Ghosts: To display your cardboard tombstone ghosts, you can simply lean them against trees, your house, or even a fence. If you want them to stand upright, glue or tape a small cardboard stand to the back of each tombstone. This will help them stay in place, even if there’s a breeze.
  6. Optional Touches: For added spookiness, you can paint the back of the tombstones black and place a small, battery-operated LED light behind each one. The light will cast an eerie glow and make your tombstone ghosts look even more haunting at night.

These cardboard cut-out tombstone ghosts are a fantastic way to create a creepy cemetery scene without spending a lot of money. They’re lightweight, easy to make, and perfect for indoor or outdoor Halloween decorations.

Plus, it’s a great project to do with the kids, getting everyone in the spooky spirit!

28. Pool Noodle Tall Candle Jack-O-Lanterns

Get ready to create some fantastically tall and spooky Jack-O-Lanterns using orange pool noodles! These DIY decorations are perfect for adding a festive and eerie glow to your Halloween setup.

They’re fun to make, and the LED string lights inside will give them that perfect candle effect without any real flames.

Materials Needed:

  • Orange pool noodles
  • LED string lights
  • Black paint or markers
  • White construction paper
  • Glue or tape
  • Scissors

Steps:

  1. Preparing the Pool Noodles: Start by cutting the pool noodles to your desired candle heights. You can make a variety of sizes to create a dynamic and interesting display. Use a sharp knife or scissors to make clean cuts.
  2. Creating the Candle Drip Effect: Cut strips of white construction paper to resemble dripping wax. Make them uneven and jagged for a more realistic look. Glue or tape these strips around the top edges of the pool noodles, letting them hang down the sides. This will give the appearance of melted wax dripping down the candles. You can also wrap with fake spiderwebs for a cool effect.
  3. Painting the Faces: Use black paint or markers to draw Jack-O-Lantern faces on the pool noodles. You can make classic triangular eyes and a jagged mouth, or get creative with different expressions. Be sure to leave enough space at the top for the light to shine through.
  4. Inserting the LED String Lights: Carefully insert the LED string lights into the center of the pool noodles. Make sure the lights are evenly distributed inside each noodle to provide a consistent glow. If the LED string lights come with a battery pack, place the pack at the bottom of the noodle, ensuring it’s accessible for turning on and off.
  5. Securing the Lights: To keep the LED lights in place, you can use a bit of glue or tape around the top edge of the pool noodle. This will prevent the lights from slipping inside. Just be careful not to cover too much of the light opening, so your Jack-O-Lanterns can shine brightly.
  6. Setting Up Your Candle Jack-O-Lanterns: Arrange your tall candle Jack-O-Lanterns around your porch, yard, or even inside your home. They make fantastic Halloween decorations that are both spooky and safe. You can place them in groups for a dramatic effect or scatter them around for a more whimsical look.
  7. Secure Them to the Ground. Since these are lightweight wind is your biggest enemy. If setting them up outside I would recommend attaching them to a board or two at the base that are screwed crossways to make sure that they don’t fall over. You can then use wire through the noodles at the top to keep them from bending or swaying.

These pool noodle Jack-O-Lanterns are not only budget-friendly and easy to make, but they also add a wonderfully festive and spooky touch to your Halloween decorations.

The LED lights ensure a safe glow, and the dripping wax effect adds a nice, realistic touch. Happy Halloween crafting!

Hannah R

Hi, my name is Hannah and I'm the founder of Barefoot Budgeting. This site is dedicated to one thing... helping you! Whether it is making a budget, saving money using DIY projects, or even saving by helping you with my favorite recipes I will cover it all! If it helps you save money in your life I want to help!

Recent Posts